


Home
Products
Download
Tutorials
- Hires
Introduction
Generate the model
Connect mesh part by a modeler
Correct morph target
Web Ring/Links
Contact
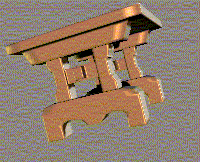
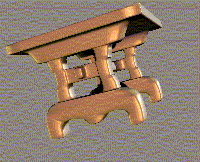
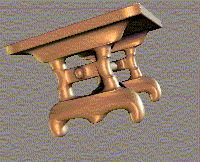
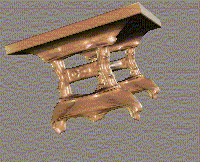
Modify the table using morph target will allow you to tune the sub-division create by hires. The table images below show you the alteration base on the dialer value.
| Value=0, base object. | Value=0.5. | Value=1, MT apply. | Value=2, outside normal. |
 |
 |
 |
 |
|
|
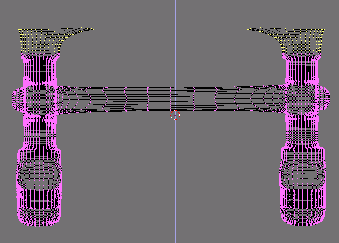  The first step identifies the vertices that can not be move by the Morph Target. To do that, load the target.obj file in your preferred modeler. Select the vertices that create the red faces on the image. To be sure, the best way is select all vertices of the upper table foot, as shows on the left image. Put them all far away of the table. Be care, we create a morph target, that means all others vertices can not be neither moved nor deleted. When finish save the new object in obj file format. The tutorial assumes that file is call temporary.obj. It is time to squeeze both temporary.obj and source.obj, that means load each file in a text editor and suppress all the line that does not begin by the v letter. Warning, the next step will use a spreadsheet, if your local setting does not allow the dot as decimal symbol, you must change the dot in comma before save the file. The first step identifies the vertices that can not be move by the Morph Target. To do that, load the target.obj file in your preferred modeler. Select the vertices that create the red faces on the image. To be sure, the best way is select all vertices of the upper table foot, as shows on the left image. Put them all far away of the table. Be care, we create a morph target, that means all others vertices can not be neither moved nor deleted. When finish save the new object in obj file format. The tutorial assumes that file is call temporary.obj. It is time to squeeze both temporary.obj and source.obj, that means load each file in a text editor and suppress all the line that does not begin by the v letter. Warning, the next step will use a spreadsheet, if your local setting does not allow the dot as decimal symbol, you must change the dot in comma before save the file.Import both files temporary.obj and source.obj in the speadsheet. Be sure that space is an allowed field separator. Now Cut and Paste, create a new document if necessary, the vertices information of the temporary file in the second column without take the first column containing the v letter only. At the next column, the ‘E’, cut and paste the source vertices. The next step is optional, if you plan to use UVmapper Pro to reorder the vertices. To be able to reorder vertices in th espreadsheet, the first column must contains the line number |
 Depending on the model type you can or not got ahead the 1 value. However, the Catmull-Clark and the Surface Curvature methods are not exactly compatible. The rendering on the right shows the table from another angle. In red appear the vertices that are modify by the Catmull-Clark method. They’re come because Hires acts on the full model. It is necessary to delete them. Two files are need, they will contains the morph of the table's foot from the two methods. The Catmul-Clark file will become the morph applies on the table. The Surface Curvature will you to correct the morph. To have it, the morph value must set to zero. Save only the lower part as morph target. Whatever the name you give to the files, the tutorial assumes that the file called source.obj is the one created from the surface curvature method and the target.obj from the Catmull-Clark.
Tips: Delete the first comments, all line beginning by #. To quickly found the last line using the v, go to the find menu and search the first occurrence of vt.
Tips: In Excel the easier way to create the first column is put a 1 in the first and a 2 in the second. Select both cells and click on the little black square. Down the mouse until there is no vertices information, release the mouse will create the first column. Doing that you have created the line information, but outside the range really need. It is easy to delete them, by putting the cursor on the second column and push in order the "end" and "up" key. That will move the cursor on the last line containing vertices information. Put the cursor at the beginning of the next line. And type the next sequence "shift", "end", "down" and "del", that will delete all the unnecessary lines number.
Identify the spreadsheet’s columns.
| A | B | C | D | E | F | G |
| Line # | Target model | Source Model | ||||
| X | Y | Z | X | Y | Z | |
In the example, the vertices have been move under the X axis to increase their value. So the table will be order on the B columns in reverse mode. Search in the same column, the first line containing a normal value (for Poser usually between -1 and 1). Cut and paste all data from the E to G on B to D columns after this line to the end of the table. To put the vertices back at their original location, order the A column in ascending mode. Replace all the line number by the letter v. Export the column A to D, if necessary modify the column width so a value in a column will not override the previous value. Save the spread table under a prn file, if you use excel. If you have converted the dot in comma, open the file in an editor and replace all commas in dots. Rename the extension to .obj.
Final result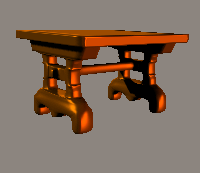 Start Poser and load the table. Apply on the lower part the morph created just above. Found the dialer value that fit your needs. When found, save the table as Wavefront object to use it as prop or create a new figure. The final table on the left show the table with a 0.7 value to the morph created with the "Catmull-Clark" method applies to the table creates with the surface curvature method. Start Poser and load the table. Apply on the lower part the morph created just above. Found the dialer value that fit your needs. When found, save the table as Wavefront object to use it as prop or create a new figure. The final table on the left show the table with a 0.7 value to the morph created with the "Catmull-Clark" method applies to the table creates with the surface curvature method. |
All registered trademark and logo in this tutorial belong to their respective owner
Author: Guy Demesmaeker.
This is the second version of this tutorial.
|