


Home
Products
Download
Tutorials
- Hires
Introduction
Generate the model
Connect mesh part by a modeler
Correct morph target
Web Ring/Links
Contact
This tutorial explains how create objects with "HIRES", the program develop by Bruce Lamming. It expects that the reader have the knowledge to uses the others programs. They are Blender, Poser, Word, Excel and UVmapper Pro. However others programs can be use as 3D-studio max may, UVMapper Classic or any words program or spreadsheet that can use big files.
Objective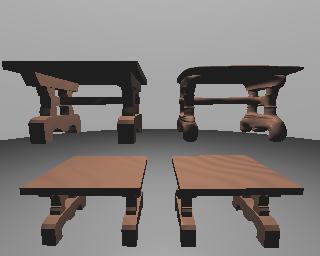 |
Blender with its "sub-surf" feature allow a mesh with low polygon to be render as a high polygons object. The image on the left shows four tables. The original mesh resides on the upper left corner. Beside, its copy using the Blender Sub-Surf feature. Each table have below the mesh resulting on the export and import process in Wavefront format. As all tables are exactly at the same definition level, the Sub-Surf information disappears during the process. The Blender users will divide and smooth the mesh before exporting it. But not everybody uses a modeling program. Fortunately, there is "Hires", a dedicated program that subdivides a model. Some of its feature are not available anywhere else. |
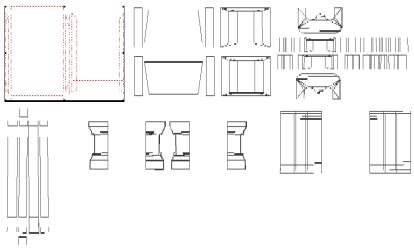
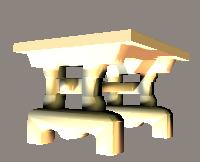 The final result expected for the table will be obtained by a mix from the original model and its sub-surf copy. The table’s upper part must be as close as possible from the original model. The lower part must be subdivided to give an old hand fashioned appearance. Assign the texture map and divides the table in two group with UVmapper Pro. The table elements are locate to assume they are created from real pieces of wood. At this time the UV mapping does not need to be the final one because it may be change later. It is just important to locate elements to be easily manipulated later. The UV template on the right shows in red the upper part, in black the lower part of the table. With UVmapper Pro, the top have been manipulated to create the hard edge. Does not forget to weld the model before save it. On the left there is the table rendering imported it in Poser. As you can see the upper part have sharp edge. All the rest is smooth by Poser. The final result expected for the table will be obtained by a mix from the original model and its sub-surf copy. The table’s upper part must be as close as possible from the original model. The lower part must be subdivided to give an old hand fashioned appearance. Assign the texture map and divides the table in two group with UVmapper Pro. The table elements are locate to assume they are created from real pieces of wood. At this time the UV mapping does not need to be the final one because it may be change later. It is just important to locate elements to be easily manipulated later. The UV template on the right shows in red the upper part, in black the lower part of the table. With UVmapper Pro, the top have been manipulated to create the hard edge. Does not forget to weld the model before save it. On the left there is the table rendering imported it in Poser. As you can see the upper part have sharp edge. All the rest is smooth by Poser. |
 |
|